3 Different Ways On How To Make Your Footages Look Cinematic
Today, i'm showing you on how to achieve cinematic looks on your footages shot by an action camera or mobile phone camera. I never attended any lessons or classes from any school or people, you just have to simply read online tutorials, ask some amateur-pro film makers or watch videos online to learn. Attending classes is absolutely better but you can learn such things if you love exploring things over the world wide web.
1. Adding Cinematic Bars or (Title bars)
Note: I'm using Adobe Premiere Pro CC or CS6 for managing timeline and Adobe After Effects for transitions,effects and color grading.
Step 1. Make sure Adobe Premiere Pro CC or CS6 is installed and updated to avoid errors or unnecessary updates. Make sure to set it on HDV Capture format for it to render and produce higher quality settings
Step 2. Choose a format which fits your video and matches your taste.
Step 3. Import your videos or photos
Go to File and look for Import or just press Ctrl Key + "I"
Step 4. Add your "Title Bars or Cinematic Bars" to your project timeline
-Look for the Project tab and press right click too add "New Item", then click "Title"
Step 5. Edit and Format your Title Bars
-Look for the rectangular tool to add bars on your layer/footage.
-Create two rectangular bars then put it on top and bottom of your layer/footage.
-Set their colors into black using the color tool by click each one of them.
Step 6. Once finished, Drag and drop the cinematic/title bars on the timeline( See it below)
See Results below:
Before
After
The purpose of adding cinematic bars is to capture the viewer's perspective and focus instead. Good example is when watching Daily Tv shows vs. Watching movies. Most of us pay attention when watching movies since we view it with much focus than we do when watching T.V shows, documentaries or commercials.
2. Color Grading/Color Correcting
These are two of the most important factors when making a film. Others spend hours before hitting export button just to assure that the videos compiled will be pleasant and eye-catching to viewer's eyes. Coloring a video is one of my favorite thing to do when making a film since it gives life and emotion to it. There are different ways to do it but i'm going to show one of the most easiest way to do it.
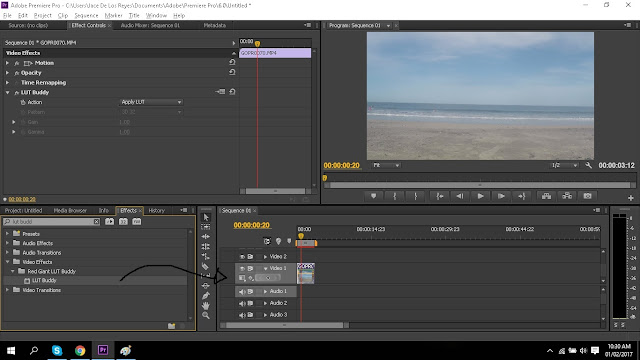
Here i am going to use LUT buddy from Red Giant. You can buy it or download it from Red Giant's Site.
Step 1. Make sure your videos are imported to the timeline
Step 2. Drag and drop "LUT Buddy" preset on your video
Step 3. Import your LUT or Look up table
See Results Below:
Before
3. Choose Correct FPS or Frames Per Second
Use 23.976, 24 and 25 fps when rendering the whole film. Most traditional films use these fps since it gives you a decent motion blur which is mostly seen in many films. Note: If you are a gamer who records gameplay, use 30/60 fps since it is the standard of many game replays on the internet.
Here are my other videos for 2017
"The Art of Sharing"
Link:https://www.facebook.com/Mr.MiddRite/videos/1025644947581833/
Link:https://www.facebook.com/Mr.MiddRite/videos/1025644947581833/
"My Year 2016"
Link:https://www.facebook.com/Mr.MiddRite/videos/1022604044552590/
Link:https://www.facebook.com/Mr.MiddRite/videos/1022604044552590/
"Random Cuts In Zambales"
So good luck and keep experimenting to get a perfect taste for you needs. Thanks for viewing and stay tuned for more tips and tricks.
Feel free to send me message or ask questions on my links
Facebook: https://www.facebook.com/Mr.MiddRite
Skype: mr.middrite Google +: https://plus.google.com/u/0/112412082674301353421 Instagram:mrmiddrite |
DISCOVER| TRAVEL | SHARE


0 comments: